Scrap Dragon Xtreme Version 3.0.9 Release Notes January 2017
New in this release of Scrap Dragon Xtreme are the following enhancements. Click here for previous Release Notes

1. The VIN Number will show in the search parameters.
2. The Make and or Model fileters have been added to filer the report.
![]()
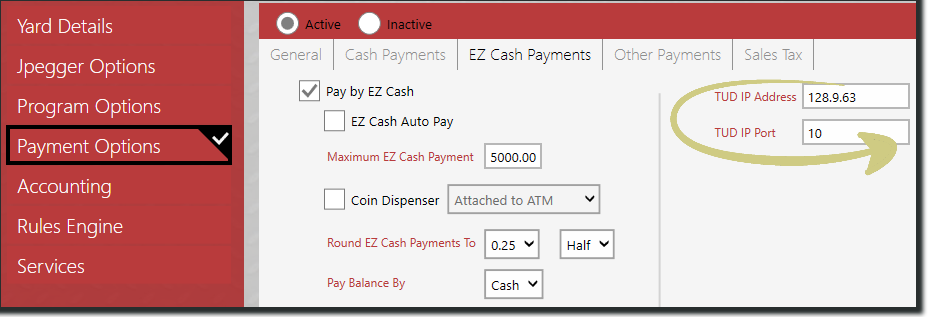
1. To Set up:
- From the Home page, choose the System Configuration Menu.
- Select yards and choose your yard.
- Now, select the Payment Options menu from the left.
- Select the EZ Cash Payments tab
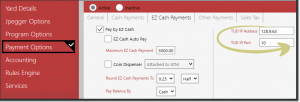
- Be sure to fill out the new fields for TUD IP Address and the TUD ID Port.
2. Report
- From the Home page, select Reports.
- Now choose the Cashier menu.
- Select EZCash Payment and choose either Preview Report or Export Data from the Action Items menu.
1. To Set up:
- Select the Account tab from the General menu.
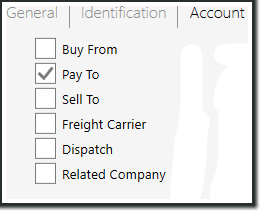
- Here you can select how the account should be set up. You can now mark a Customer as “Pay To” only when you select only the \
 checkbox.
- Select Save.
2. From theBuy screen:
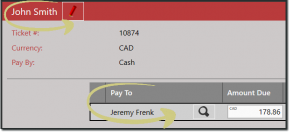
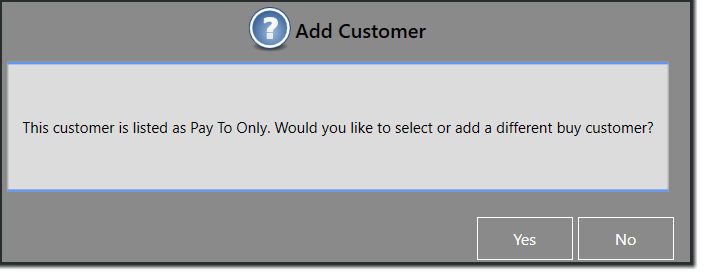
- Choose Customer Ticket to start a ticket.
- Search for and select the customer that you will ultimately pay to. When selected, you will see this message pop up to remind you to add the driver as a customer on the ticket as well.
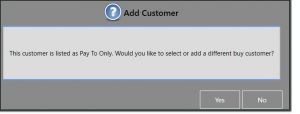
i. If you need to add the driver as a customer on the ticket as well, choose Yes.
ii. If the Pay To and the driver are the same, choose No and continue as usual. - If you select Yes, you will be directed to the Customer search screen.
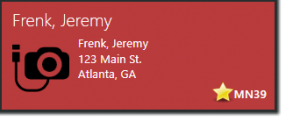
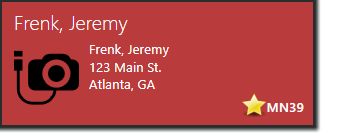
i. The Customer Lookup screen will be prepopulated with customers that are listed as Pay To in the customer master (they are designated with a star on the Customer Tile). You can also search for any other customer as normal.
- When you complete the ticket and pay it, you will see both the driver and the Pay To customer listed on the ticket.


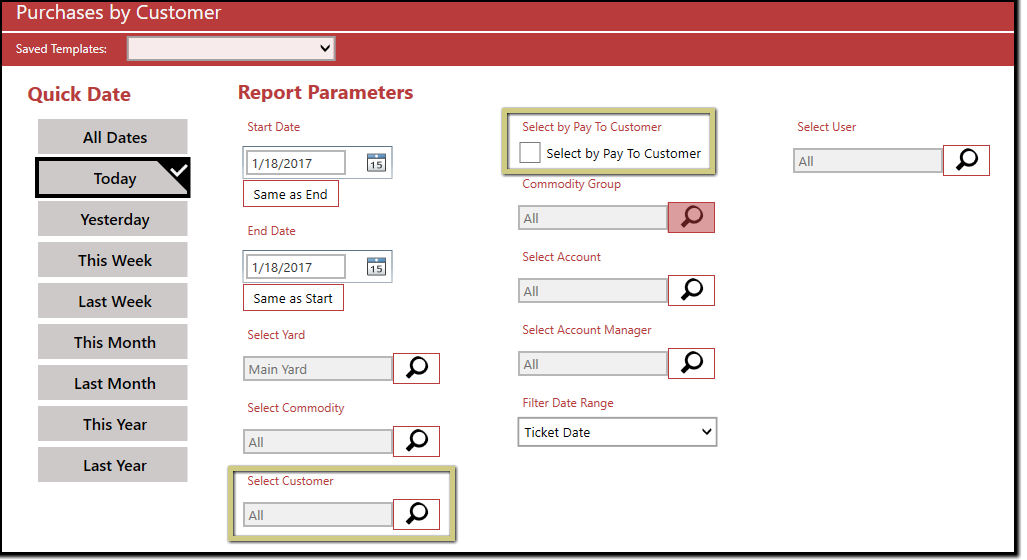
- From the Reports screen, select Tickets Awaiting Approval.
- Select Preview Report or Export Data.
- Edit the parameters.
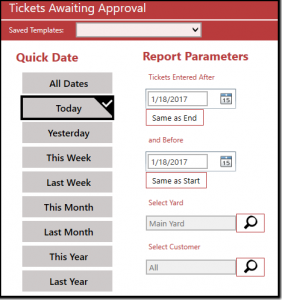
- Select Run Report.

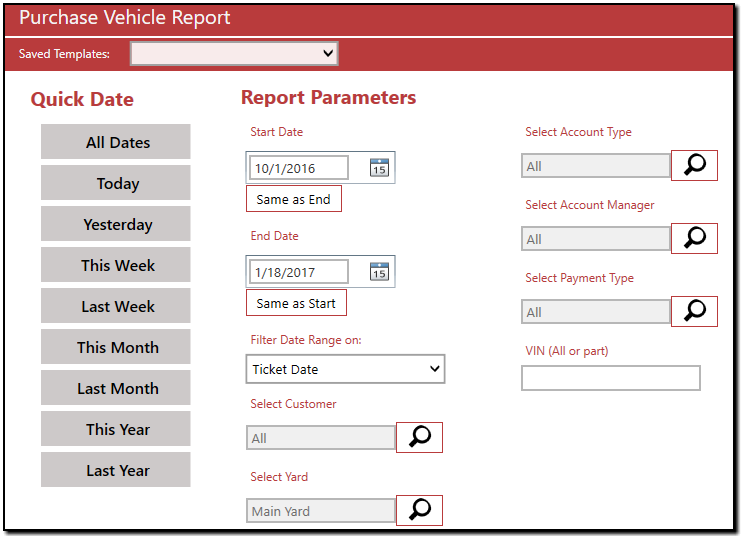
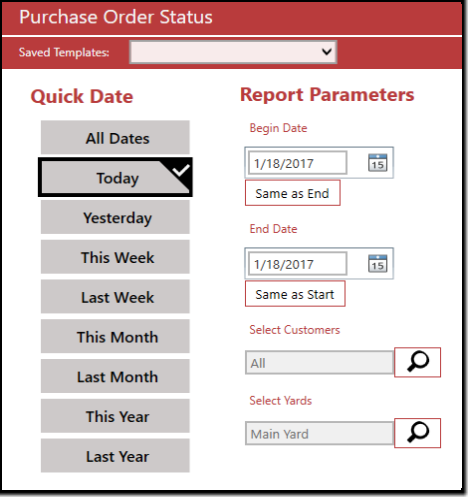
- From the Reports screen, select Purchase Order Status.
- Select Preview Report or Export Data.
- Edit the parameters.

- Select Run Report.
- Search for the customer and double-click the tile.
- From the Customer Edit screen, select Print License Image from Action Items.
- You will see a printable version of the Customer profile with licence image included.
- Select Print
 or Save
  .
.
Note: Some companies that sell may be exempt from this list as they already have a standing approval.
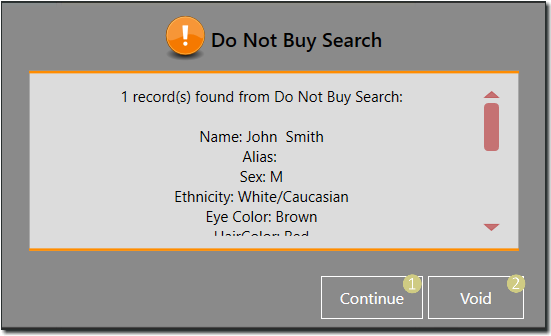
1. From the Buy Screen:
- Create a ticket from the Buy screen and select the customer as usual.
- When you choose customer, the system will automatically check the Ohio DPS database to see if the selected customer is on the DO NOT BUY list.
Note: If the process times out, close out of the ticket and start again.
After the search runs, you will either see:
- A white bar at the bottom of the screen which shows the customer has passed the search.

- A dark grey bar which shows that the customer did not pass the search.
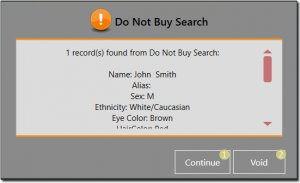
In the case that the customer did not pass, you can:
- Continue – If you think that the information coming back does not accurately match the customer.
- Void – If you think the information is correct and you want to Void the ticket.

2. Setup:
- From the System Configuration Menu, select Yard.
- Choose the Yard and select the Services menu.
- Select Ohio Dps from the Type drop-down.
- Enter the Ohip DPS web address into the Url field.
- Now, enter your specified UserName and Password.
- Type in your Facility Registration Number into the corresponding field.
- Last, use the
 to add the cameras that are customer facing. This will add the customer images to the database.
Note: Be sure to check the Enable Do Not Buy Search checkbox in order to allow this service to begin.
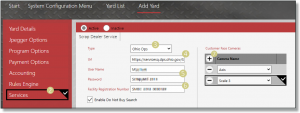

Scrap Dealer Services.API
3. To Submit a request outside of the buy screen:
- From the Home page, select User Menu.
- Now double-click Scrap Dealer Transfer from the menu (You must have permission to see this option).
• There are three pages on this screen:
- Current Transfer – This is where you can run Transfers by ticket number, receipt number, or date.
- Past Transfers – This is where you will see all past transfers (not including tests).
- Settings – This shows a read-only view of the settings that are set up in Yard> Services.
- You will also see your last transfer populate in the right column for reference.
• There are two ways to send a request to test customers outside of buy screen.
- Submit a list:
- You can submit a list by first choosing an option from the drop-down menu (either by Receipt Number, Ticket Number, or Date).
- Then, enter in a Start Number and End Number. If you want to run a single ticket or receipt, use the same number in both Start and End.
- Now choose Submit Transfer
 from the Action Items.
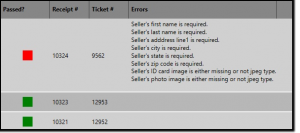
- You will see a message when the transfer is complete showing either a
pass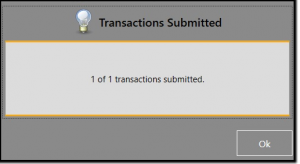 or a failure
 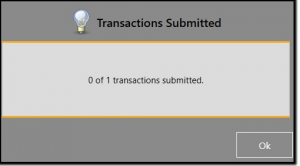 .
.
• Your submissions will be available to view in the Past Transfers screen. If it did not pass you can double-click on the failed transfer 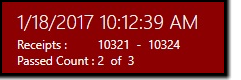 to see the details of the failed submission.
Ex: 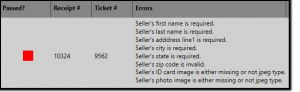
 to resbmit your selection.
- You can submit a test list by first choosing an option from the drop-down menu (either by Receipt Number, Ticket Number, or Date).
- Then, enter in a Start Number and End Number. If you want to run a single ticket or receipt, use the same number in both Start and End.
- Now Choose Test Transfer from the Action Items.
- Test transfer results will automatically generate pop up with pass or fail information for each item.
Ex: